Restore computers and virtual machines at file and system-level. Recover network shares to existing or new target locations within the IDrive BMR device.
Local restore instructions
File restore instructions for computers
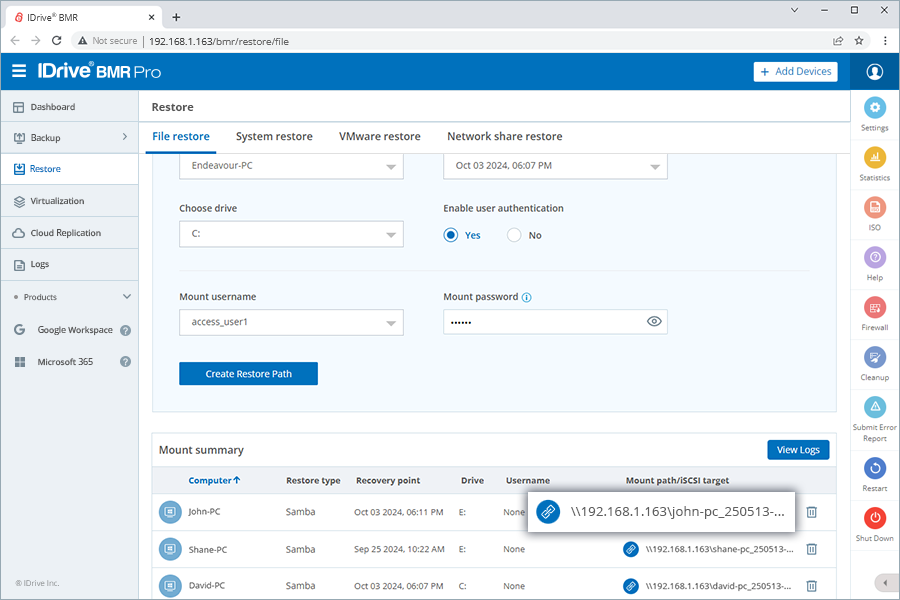
Access and restore the backed-up files and folders of your computers via restore paths available over the LAN. You can create a maximum of 5 simultaneous restore paths collectively for computers and VMware servers, irrespective of the authentication type selected.
To create a file-level restore path using Samba,
- Under Computers, click
 corresponding to the required computer. You will be directed to file restore, for the latest recovery point of the computer.
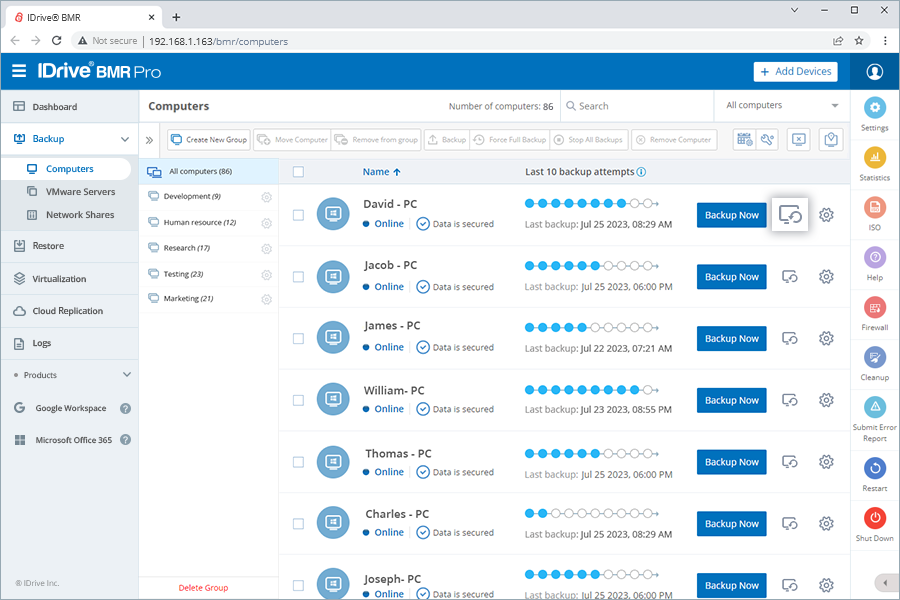
Alternatively, go to Restore > File restore and select the required computer and recovery point. - Select Samba under Select restore type.
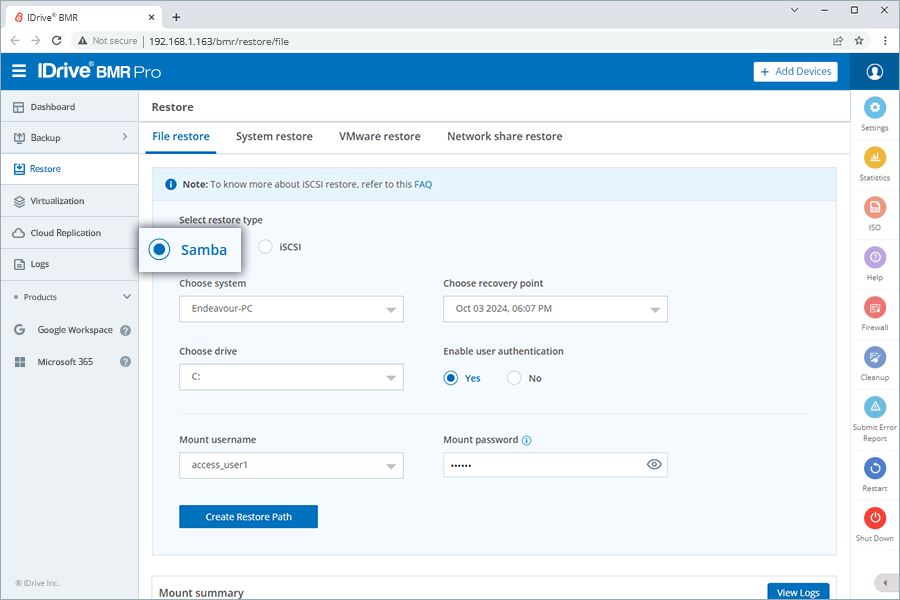
- Select a computer from the Choose system dropdown.
- Select a recovery point from the Choose recovery point dropdown.
- Select the drive from the Choose drive dropdown.
Note: Samba does not support file restore functionality for drives with the ReFS file system.
- By default Enable user authentication will be selected as 'No'. This will create an open share that is accessible on the network. To create a secure share,
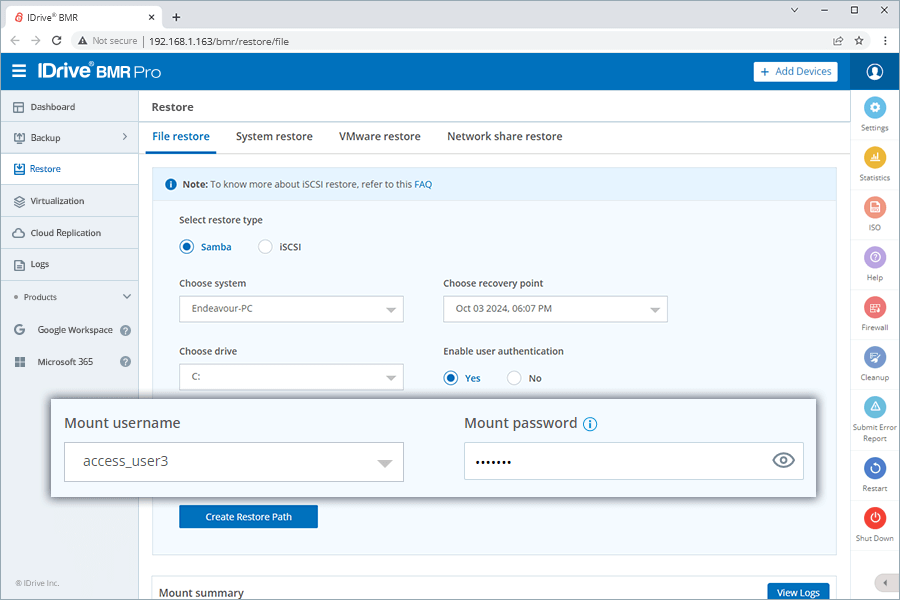
- Select 'Yes' to enable user authentication.
- Select the username from the Mount username dropdown.
- Enter the mount password.
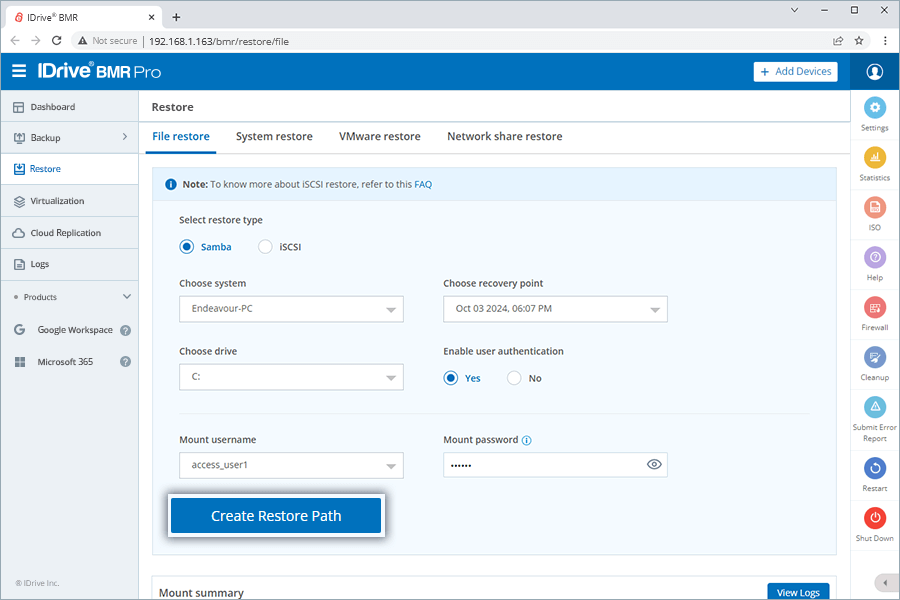
- Click Create Restore Path. A summary for the selected computer will be created in the Mount summary section. You can use the path displayed under the Mount path/iSCSI target field to access your backed-up data.
To create a file-level restore path using iSCSI,
- Under Computers, click corresponding to the required computer. You will be directed to file restore, for the latest recovery point of the computer.
Alternatively, go to Restore > File restore and select the required computer and recovery point. - Select iSCSI under Select restore type.
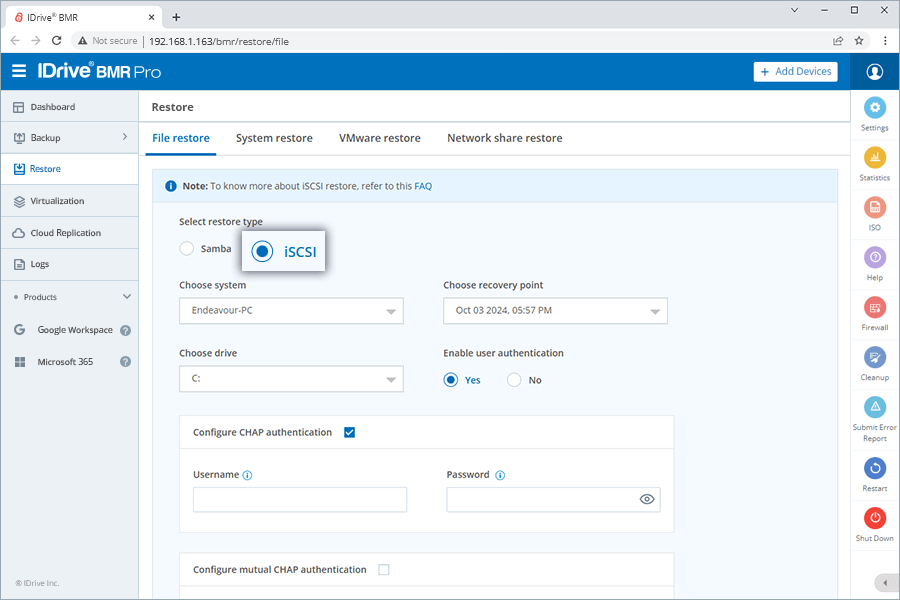
- Select a computer from the Choose system dropdown.
- Select a recovery point from the Choose recovery point dropdown.
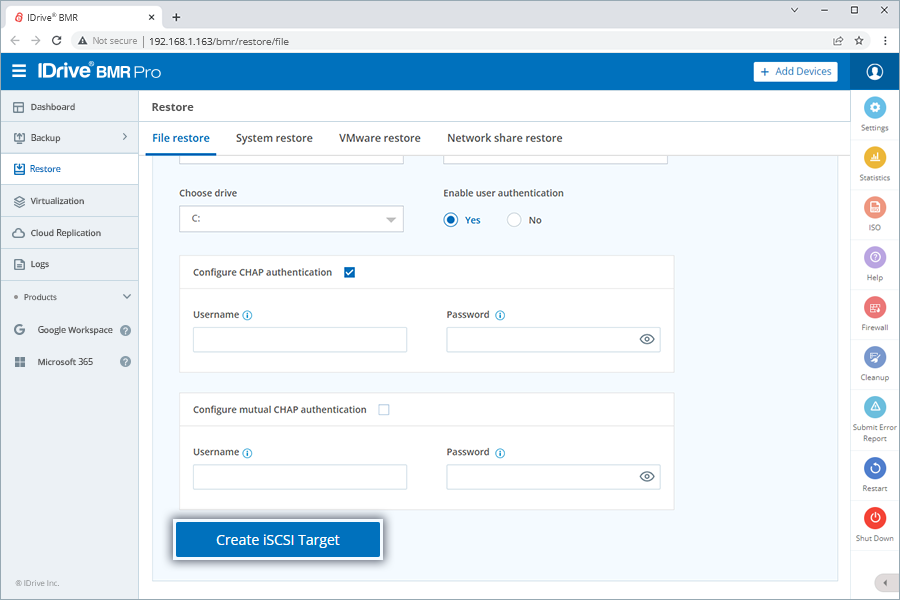
- Select the drive from the Choose drive dropdown.
Note: iSCSI supports file restore functionality for drives with both ReFS and NTFS file systems.
- By default Enable user authentication will be selected as 'No'. This will create an open share that is accessible on the network. To create a secure share,
- Select 'Yes' to enable user authentication.
- Configure CHAP and Mutual CHAP authentication.
- Enter the username and password.
- Click Create iSCSI Target. A summary for the selected computer will be created in the Mount summary section. You can use the path displayed under the Mount path/iSCSI target field to access your backed-up data.
File restore via iSCSI protocol allows you to create a virtual disk (referred to as an iSCSI target) from your backup. Once the iSCSI target is mounted on your system, it behaves like a local disk, allowing you to browse and restore files directly from it.
Note: Both the IDrive BMR device and the Windows machine must be on the same network for successful access to the iSCSI restore.
System restore instructions for computers
Restore data to a target machine that is on the same network as your IDrive BMR device.
Prerequisite: Create a bootable USB or CD using the IDrive BMR Recovery Media Builder.
View the instructions to build the recovery media
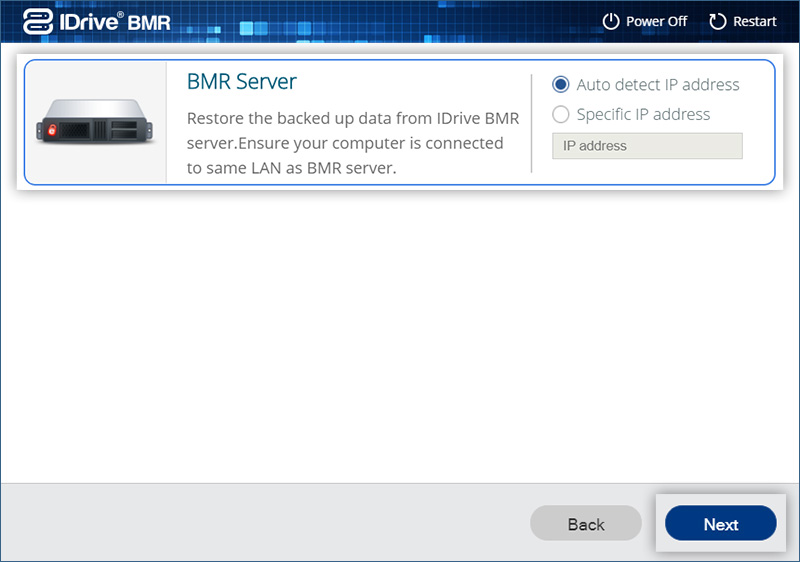
To initiate restore,
- Connect to the IDrive BMR device.
- With the Auto-detect IP Address option (recommended), you can connect automatically to any available device within the network.
- With the Specific IP Address option, you can connect to a particular device. This is useful when you want to connect to a specific device in a network having multiple IDrive BMR devices installed.
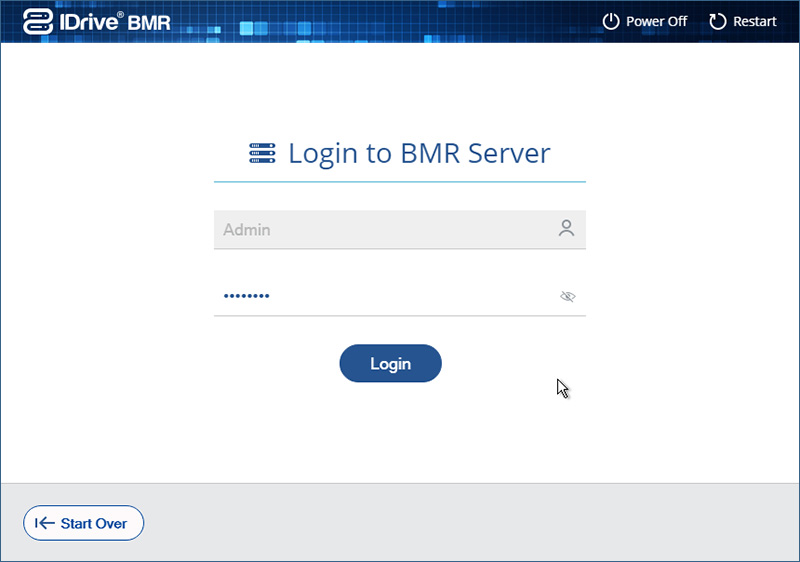
- Sign in to the IDrive BMR device with your user credentials.
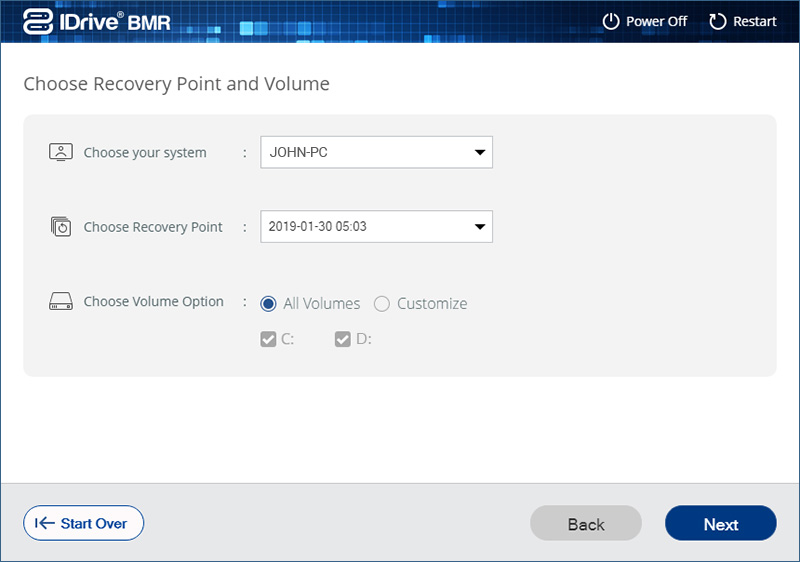
- Choose the system and recovery point from the respective dropdown menu.
- Choose the appropriate volume option and click Next.
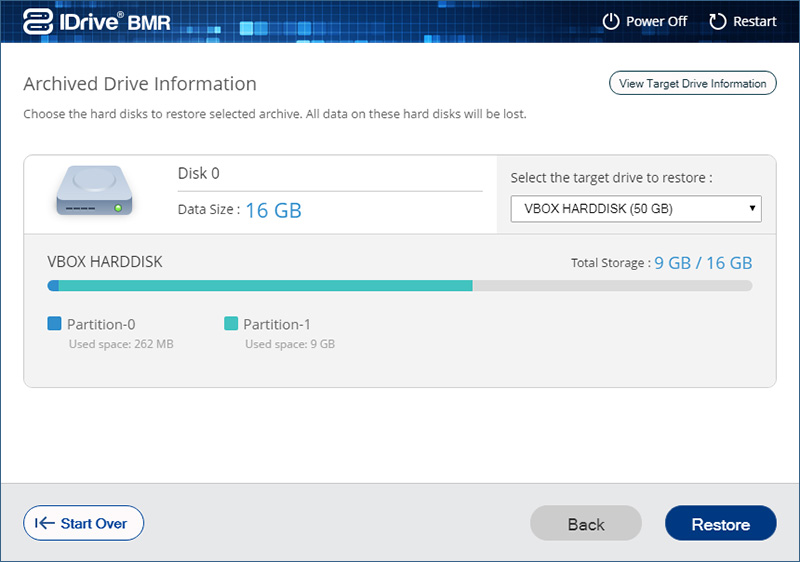
- Select a destination drive.
- Once the restore process is initiated, any previously existing data on the chosen destination drive will be deleted.
- Select a drive with equal or greater storage than the original machine.
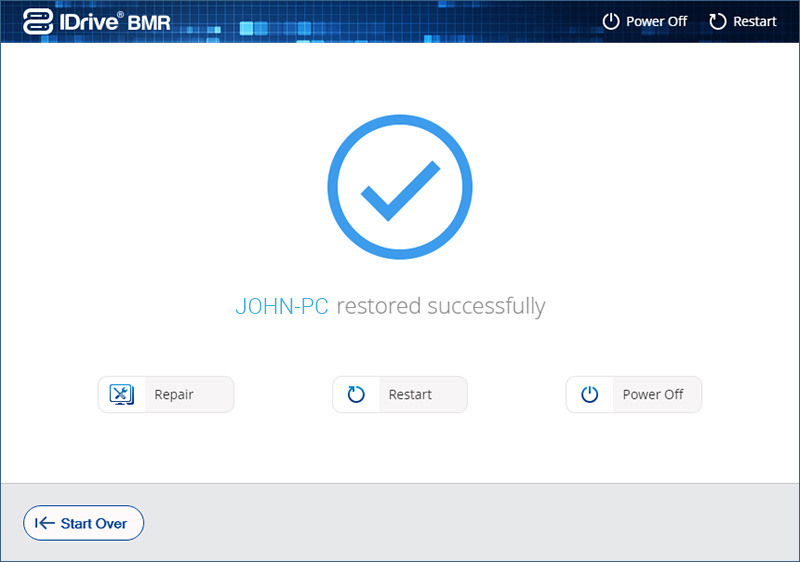
- You will receive a confirmation message when the restore is completed.
Note: If you click the Back button on this page, you will be logged out and will be required to sign in to the device again.
Note:
Note:
- System restore is supported for 512-byte sector size drives, but is limited on 4K (4096 bytes per sector) drives, where it may not work as expected.
- For 4K drives, using volume restore is recommended for better results.
Linux recovery ISO
Before proceeding with system restore, you need to create a bootable CD or a bootable USB thumb drive using an ISO file and boot your computer.
The required ISO file and related information for creating bootable CD or a bootable USB thumb drive is available on the shipped device.
Booting instructions
Perform the following steps to boot your computer,
Note:
Screenshots used in the following scenario is just an example. Depending on the BIOS manufacturer you would get a different menu options.
- Switch on the computer and press ESC, F1, F2, F8 or F10 during the initial startup screen. Depending on the BIOS manufacturer, a menu would appear.
- Go to BIOS setup and select BOOT tab.
- To set a boot sequence priority, perform the following steps,
- If you are using a restore CD/DVD, then move the CD/DVD.. to the first position in the list.
- If you are using a USB drive instead, then move the USB to the first position in the list.
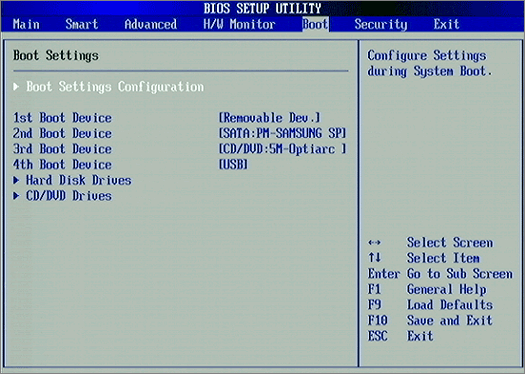
- Save and exit the BIOS setup. You can now proceed with the restore process.
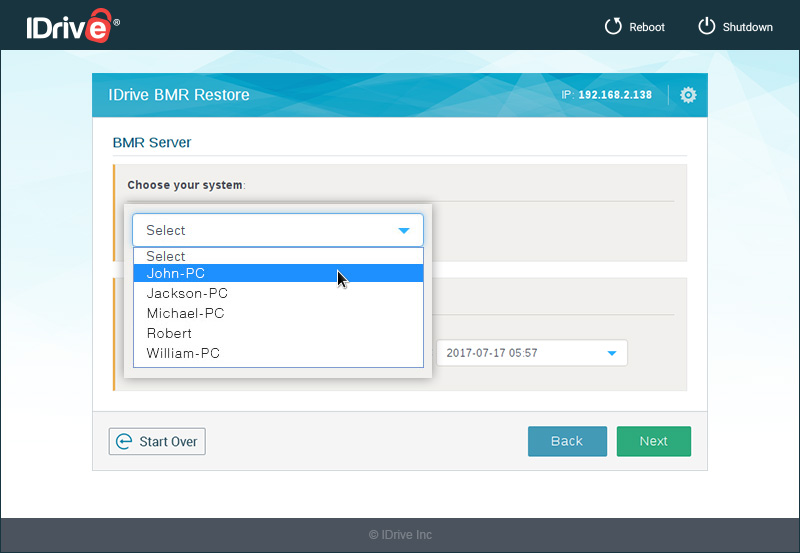
To restore your computer,
- Boot your computer using IDrive BMR Restore CD or a USB thumb drive which has restore environment.
- After booting your system, click Next in the welcome page.
- Select BMR Server and click Next.
- Enter the BMR device password and click Sign in.
- Select the system from which you want to restore the data, from Choose your system drop-down menu.
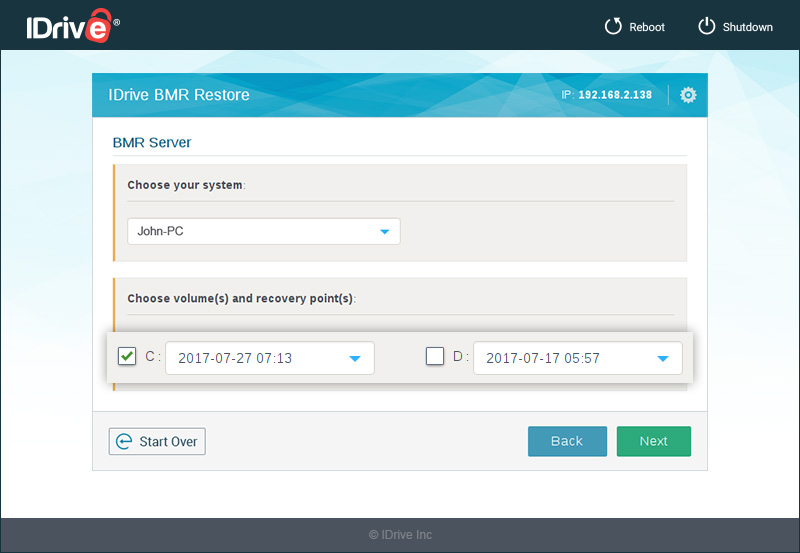
- Select the required volumes and their recovery points to restore, from Choose Volume(s) and recovery point(s) section and click Next.
- Select the drive to which you want to restore data, from Choose target drive to restore drop-down menu.
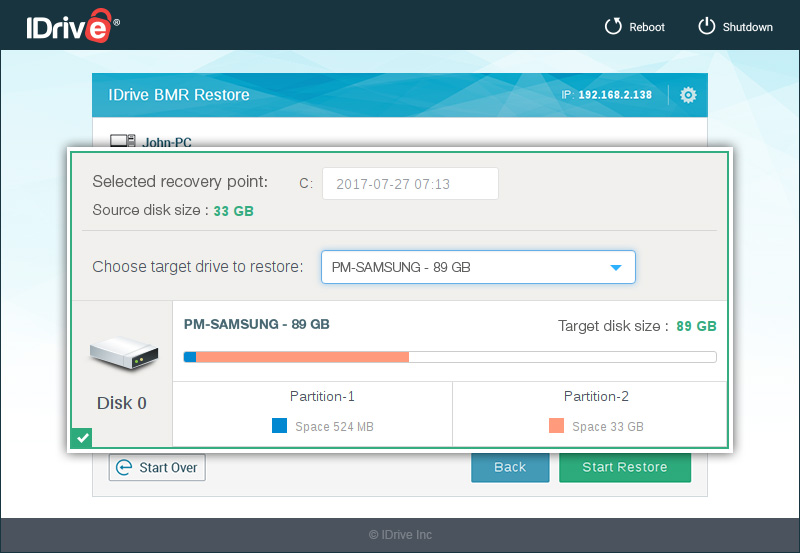
- Click Start Restore and click Yes in the confirmation window to start the restore process.
System restore instructions for older versions of the restore application
To restore your computer with older versions of the restore application,
- After exiting from BIOS setup, click OK in the confirmation window.
- Provide your username and password.
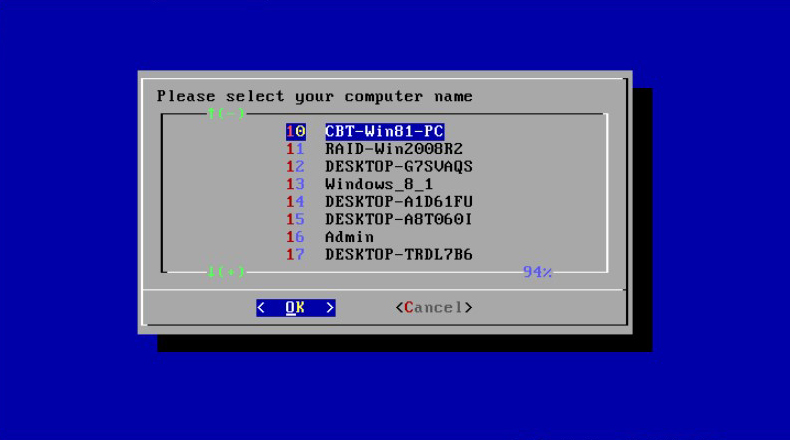
- Select the particular computer from the list of computers and click OK.
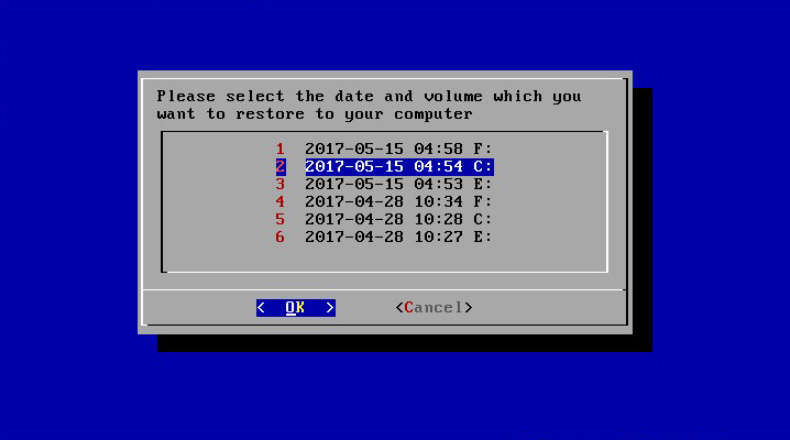
The list of drives with date and time of the last backup is displayed. - Select the particular drive you want to restore.
- Select the target drive to which you want to restore data.
- Click OK in the confirmation window.
Note:
- The 'restore computer' should at least have same hard drive space as 'backup computer'. Also, if the 'backup computer' has multiple drives, ensure that the 'restore computer' also has same number of drives.
- It is recommended that 'restore computer' have same hardware configuration as 'backup computer'. However, you may have to install the required additional drivers if there is any change in the hardware configuration of the 'restore computer'.
File restore instructions for virtual machines
Restore individual files/folders, irrespective of the operating system used on the VM. All major file systems on the VM are also supported.
Refer to this FAQ for details on operating systems and file systems that support VMware file-level restore.
To restore individual files/folders from a source ESXi host/vCenter,
- Go to Restore > VMware restore > ESXi/ vCenter. The data is shared over the SMB protocol. Based on the OS you are using, you can use the SMB client native to the OS, or install a dedicated application specific to your OS platform to access the data.
- Select the File restore radio button.
- Select the required source ESXi host/vCenter server and the target ESXi host you want to restore.
- Select a VM and the required recovery point.
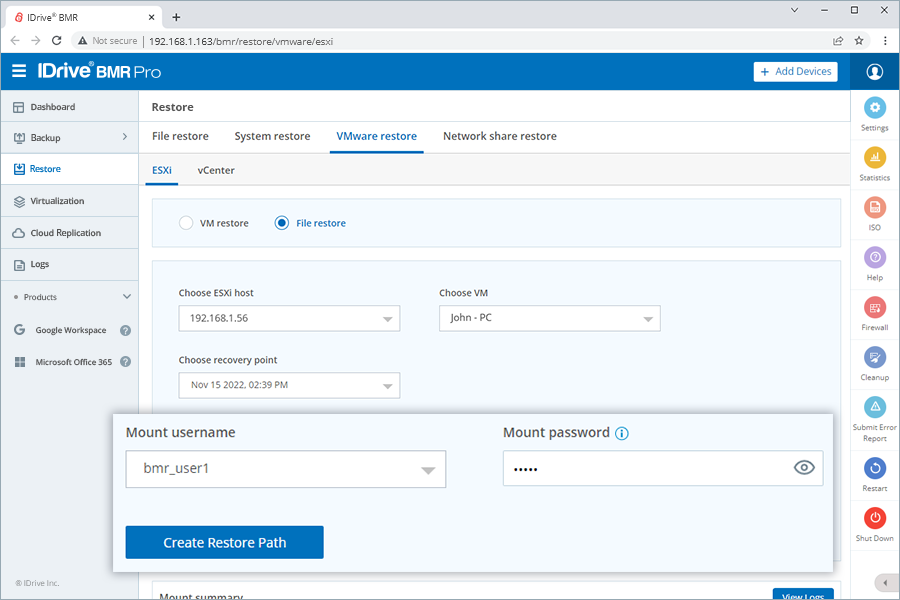
- Choose the mount username and enter the password.
- Click Create Restore Path to initiate the restore process. You can view the restore path and related details in the Mount summary section.
System restore instructions for virtual machines
Reduce recovery time objective during a data disaster by restoring entire backed-up virtual machines running on ESXi host or vCenter server.
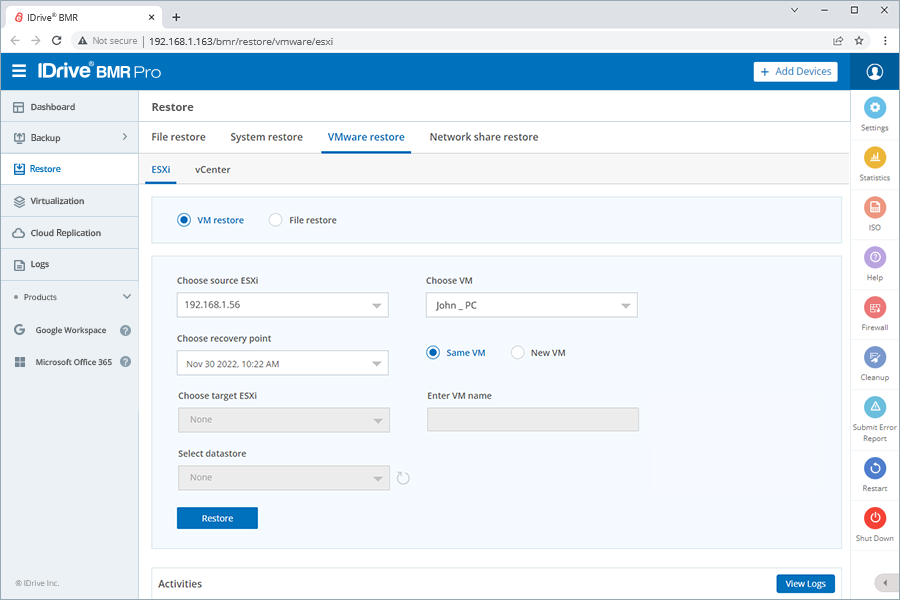
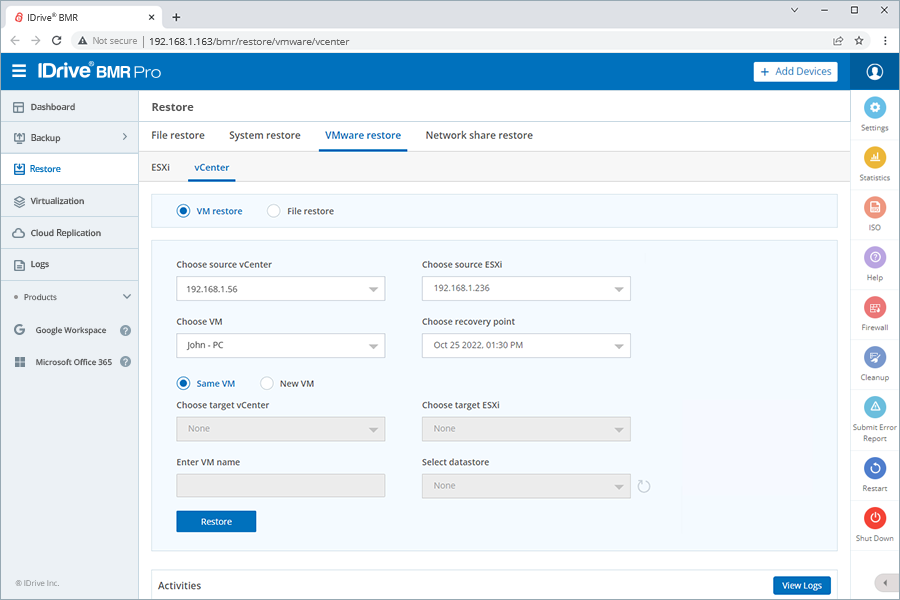
To restore a VM running on an ESXi host/vCenter server,
- On the VMware Servers tab, click corresponding to the required ESXi/vCenter VM. You will be directed to VM restore, for the latest recovery point.
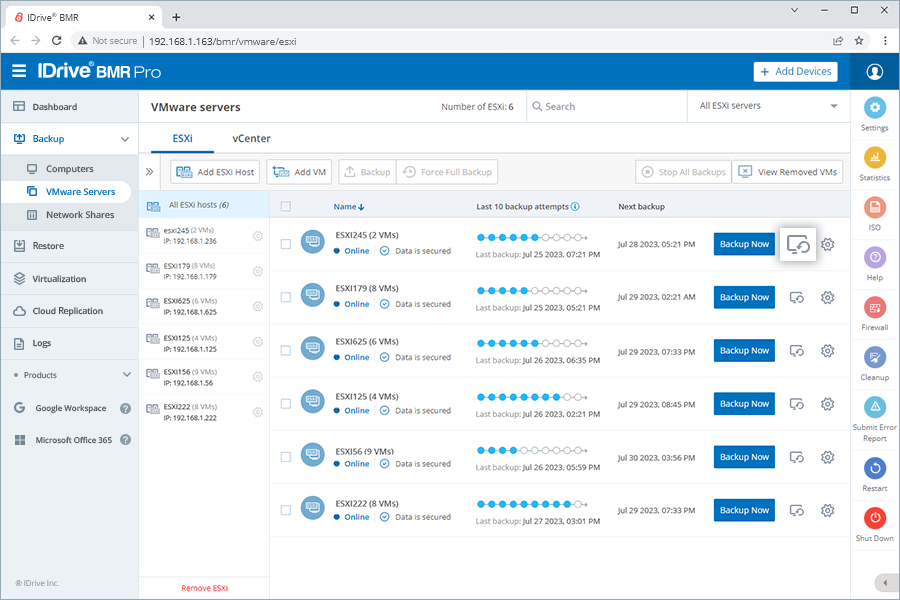
- Select Same VM if you wish to restore data to the same VM.
To restore data to another VM, select New VM, select a target ESXi host/vCenter, enter a name for the new VM, and select a datastore.
- Click Restore/Create New VM to initiate the restore process. Monitor the restore progress in the Activities section of the same screen.
Alternatively, go to Restore > VMware restore > ESXi/vCenter and select VM restore. Select the required source ESXi host/vCenter server, VM, and recovery point.
Network share restore instructions
Recover data from the local snapshots of NAS shares by creating restore paths available over LAN. iSCSI shares can be restored either to the existing iSCSI target or to a secondary target.
To restore your NAS share data from the local snapshots,
- Navigate to Restore > Network share restore.
- Choose NAS as the share type.
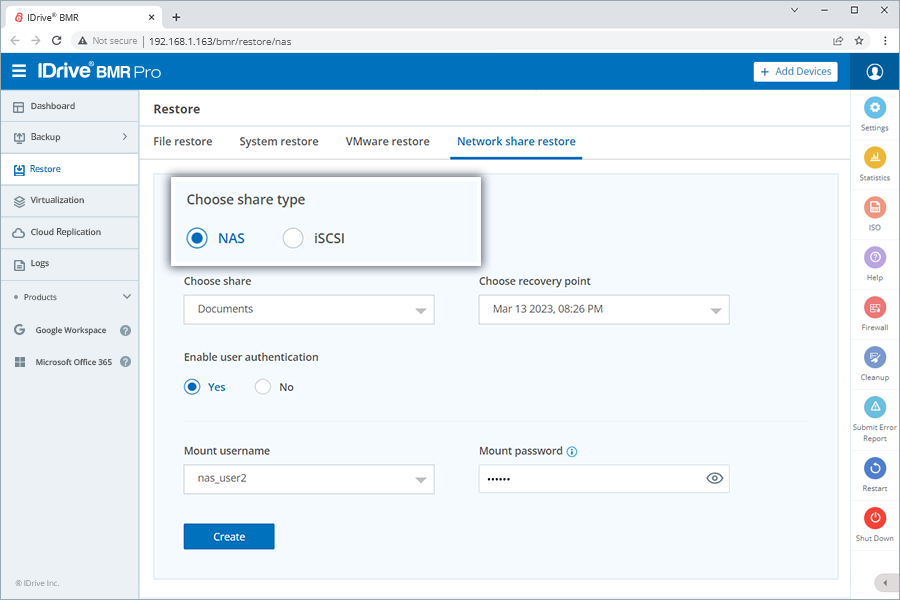
- Select the required share and recovery point.
- By default, user authentication is disabled and thus the restore path will be accessible to everyone on the network.
To create a secure restore path,
- Select 'Yes' and enable user authentication.
- Select the username from the Mount username drop-down menu.
- Enter the mount password.
- Click Create. The data is shared over the SMB protocol. Based on the OS you are using, you can use the SMB client native to the OS, or install a dedicated application specific to your OS platform to access the data.
To restore your iSCSI share data as a secondary iSCSI target,
- Navigate to Restore > Network share restore.
- Choose iSCSI as the share type.
- Select the required share and recovery point.
- Select Create a secondary iSCSI target.
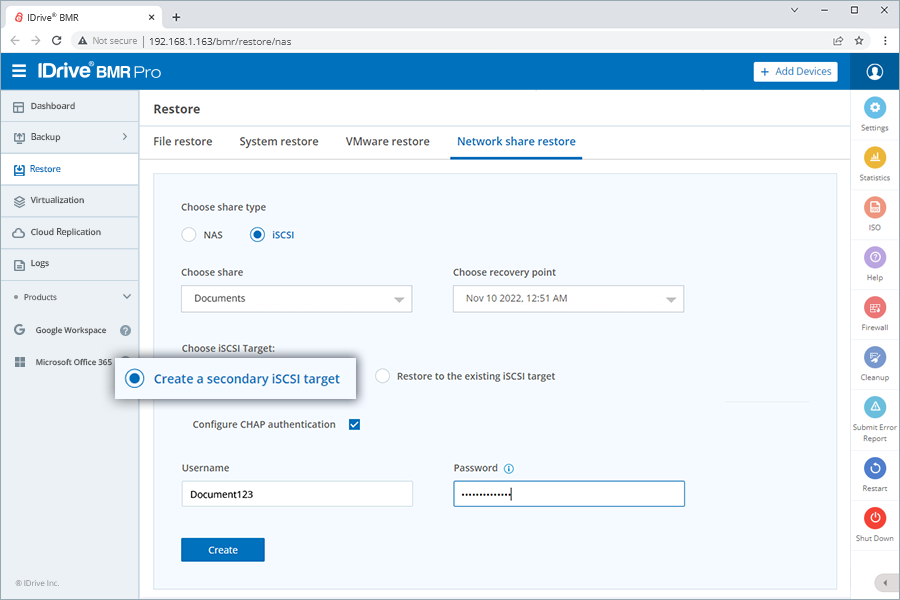
- Configure CHAP and Mutual CHAP authentication, if required.
Note: CHAP authentication needs to be enabled for configuring Mutual CHAP Authentication.
- Click Create. The data will be restored to the new iSCSI target.
To restore your iSCSI share data to the existing iSCSI target,
- Navigate to Restore > Network share restore.
- Choose iSCSI as the share type.
- Select the required share and recovery point.
- Select Restore to the existing iSCSI target.
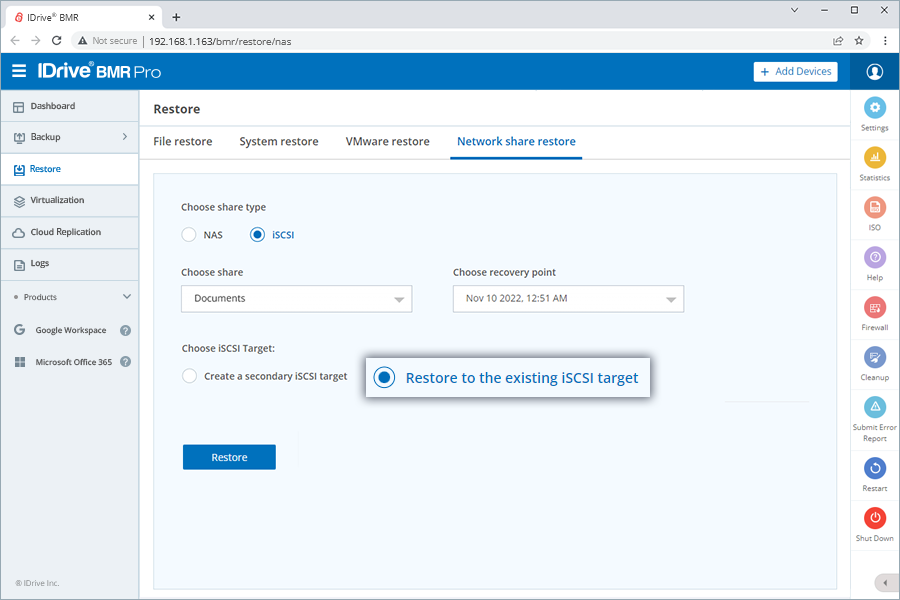
- Click Restore. A pop-up window will appear requesting confirmation to proceed with the restore.
- Data created after the selected recovery point will be permanently lost.
- Restore mounts of the time range beyond the recovery point will be automatically deleted.
- All active iSCSI connections will be terminated.
- Click Confirm to continue with the restore. The data will be restored to the iSCSI target.
Note:
Restoring your network share will effectuate the following changes,