Does IDrive support incremental backups for VMware virtual machines?
Yes, after the initial full backup subsequent backups with IDrive are incremental.
How do I disable Change Block Tracking (CBT) for VMware backup?
To disable CBT for VMware backup,
Power off the virtual machine.
Right-click the virtual machine and click 'Edit Settings'.
Click 'Options'.
Under the 'Advanced section', click 'General' and then click 'Configuration Parameters'.
The 'Configuration Parameters' dialog opens.
Set the 'ctkEnabled' parameter to false for the desired SCSI disk(s).
Power on the virtual machine.
Which ports are required by the IDrive application to perform backup and restore operations?
Ports 443 and 902 should be open and accessible on the source host to perform backup and restore operations.
How do I test the VMware connectivity to port 902?
To test Port 902 on an ESXi host, execute the following command:
C:\>telnet server 902
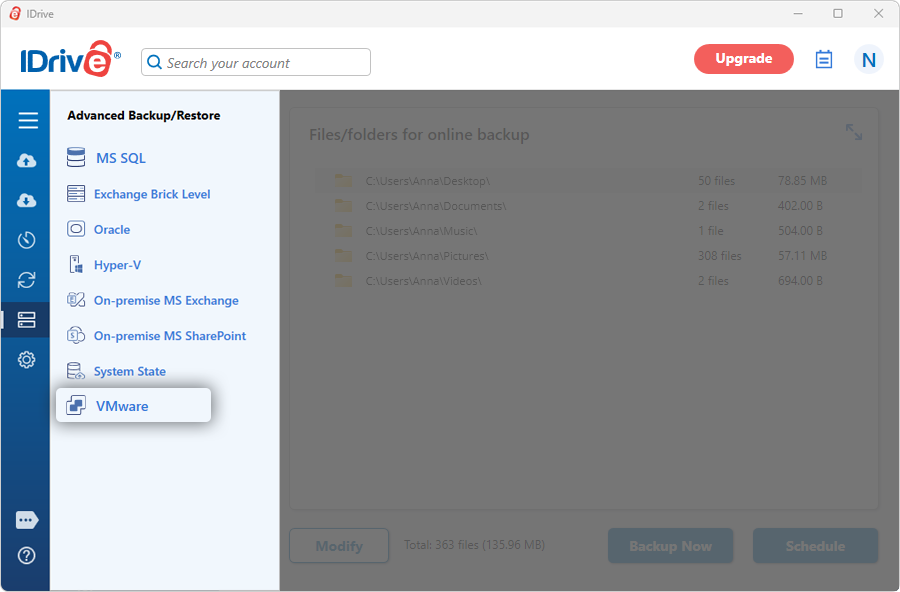
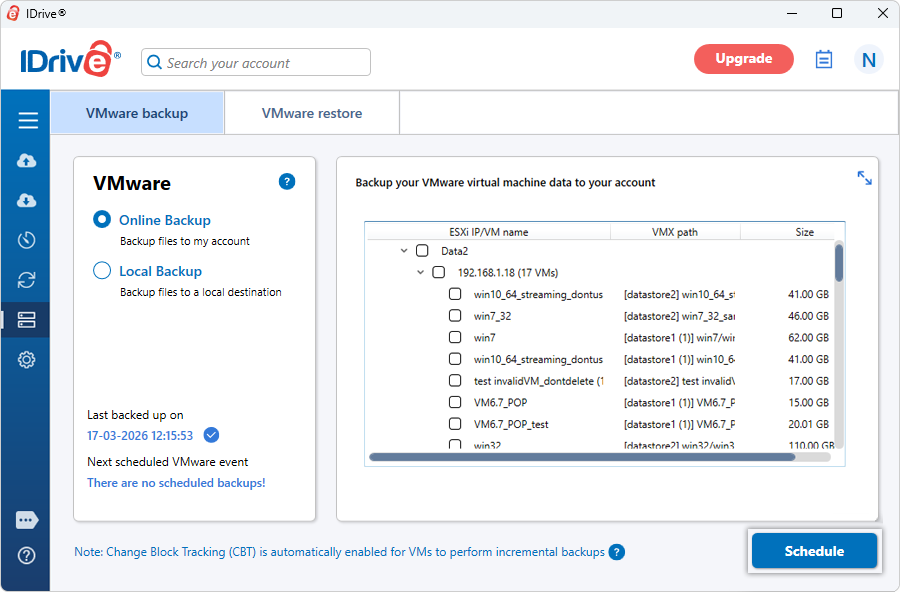
How can I backup my VMware virtual machines?
To backup your VMware virtual machine(s),
Sign in to the IDrive application and click 'Server Backup'. A slider menu will appear.
Click 'VMware'. The VMware login screen appears.
Enter valid credentials and click 'Connect'.
Select 'Online Backup’ or 'Local Backup'.
Note: On selecting 'Online Backup', the data will be stored on the IDrive cloud, whereas on selecting 'Local Backup', the data will be stored in the local drive.
Select the virtual machine(s) from the list.
Click 'Schedule'. The 'Scheduler' appears where you can schedule the backup for any future day and time or perform an immediate backup of the selected virtual machine(s).
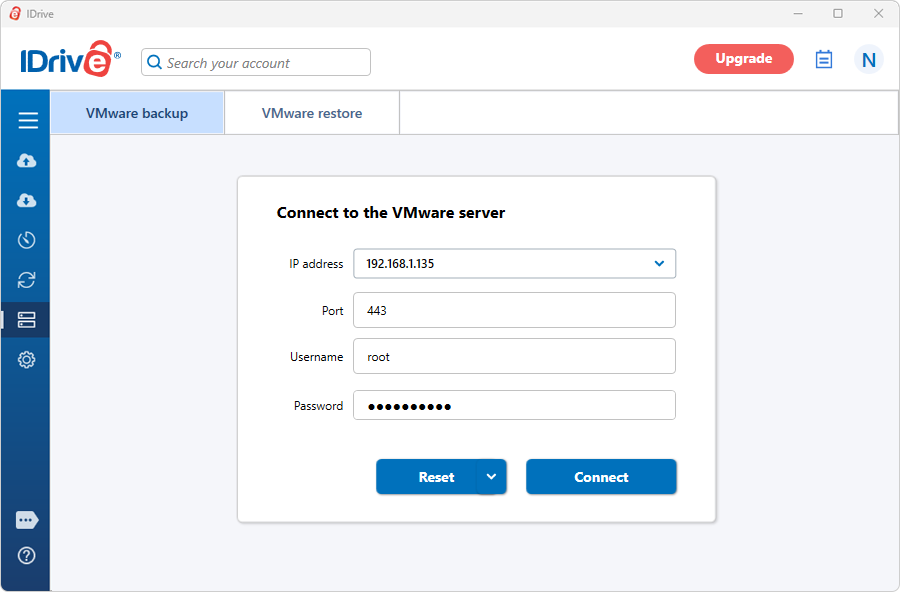
How do I view and backup virtual machines from vCenter?
To backup multiple ESXi virtual machines,
Sign in to the IDrive application and click 'Server Backup'. A slider menu will appear.
Click 'VMware'. The VMware login screen appears.
Enter IP address, Port, Username, Password, and click 'Connect'.
Select 'Online Backup’ or 'Local Backup'.
Select the virtual machine(s) from the list.
Click 'Schedule'. The 'Scheduler' is displayed where you can schedule the backup for any future day and time or perform an immediate backup of the selected virtual machines.
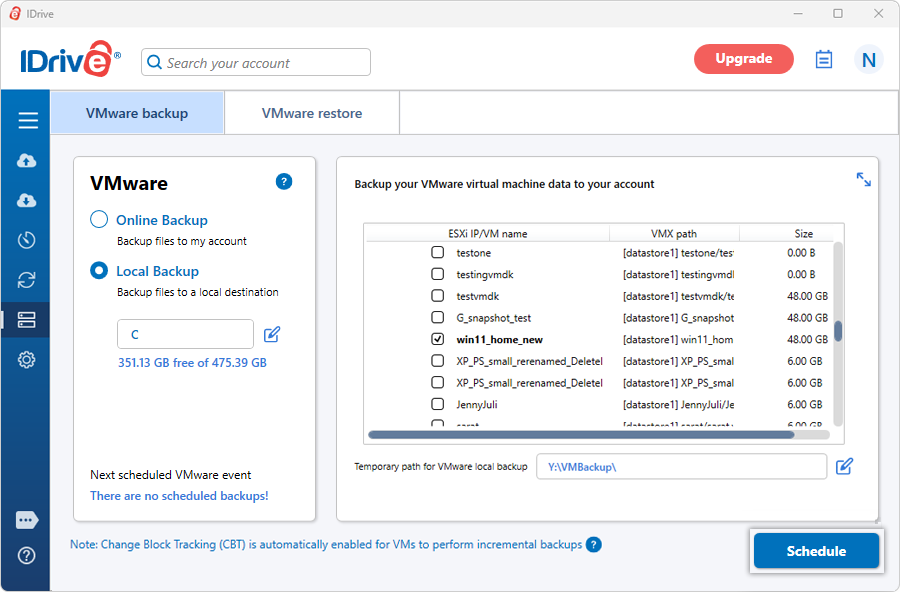
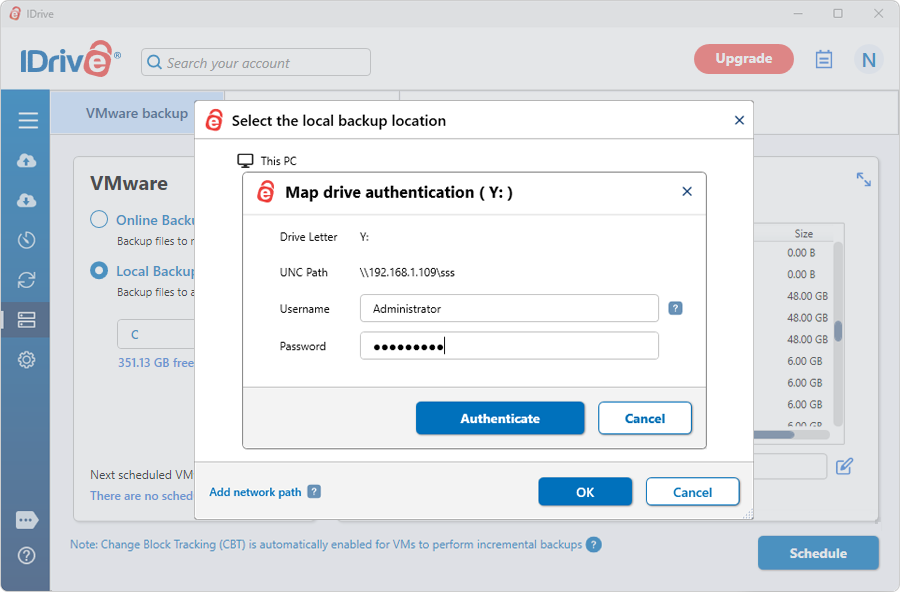
Can I backup VMware virtual machines to a network mapped drive or NAS drive?
Yes, you can backup VMware virtual machines to a network mapped drive or NAS drive. While choosing a local backup path, select the network mapped drive / NAS drive and provide the necessary authentication.
To backup your VMware virtual machine(s) to a network mapped / NAS drive,
Sign in to the IDrive application and click 'Server Backup'. A slider menu will appear.
Click 'VMware'. The VMware login screen appears.
Enter valid credentials and click 'Connect'.
Select 'Local Backup'.
Select the virtual machine(s) from the list and click 'Schedule'.
Select the network mapped drive / NAS drive as the location for creating the virtual machine backup and click 'Schedule'.
Enter your username and password to authenticate network mapped drive / NAS drive and click 'Authenticate'.
The 'Scheduler' appears where you can schedule the backup for any future day and time or perform an immediate backup of the selected virtual machine(s).
How do I backup VMware virtual machines to a UNC Location?
To backup your VMware virtual machines to a computer on the local network,
Go to 'Server Backup'. A slider menu will appear.
Click 'VMware'. The VMware login screen appears.
Enter the server IP address, Port, Username, and Password and click 'Connect'.
Select 'Local Backup'.
Select the virtual machine(s) for backup from the list which appears.
Click against 'Temporary path for VMware local backup'.
In the popup window that appears, click 'Network'. Double-click and select the required computer from the list of network computers.
You may be prompted to authorize access. Enter the username and password to proceed.
Click 'Schedule'.
The 'Scheduler' appears where you can schedule the backup for any future day and time or perform an immediate backup of the selected virtual machine(s).
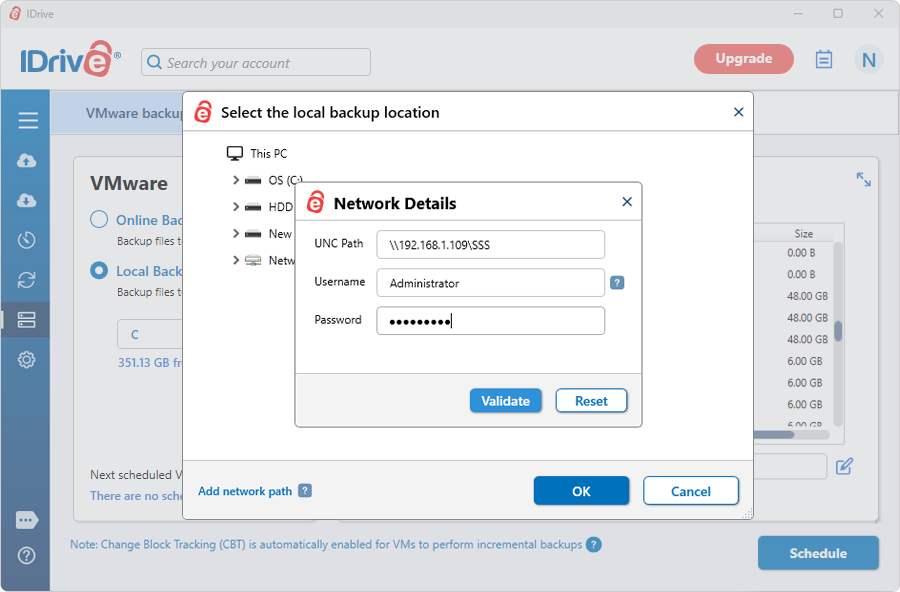
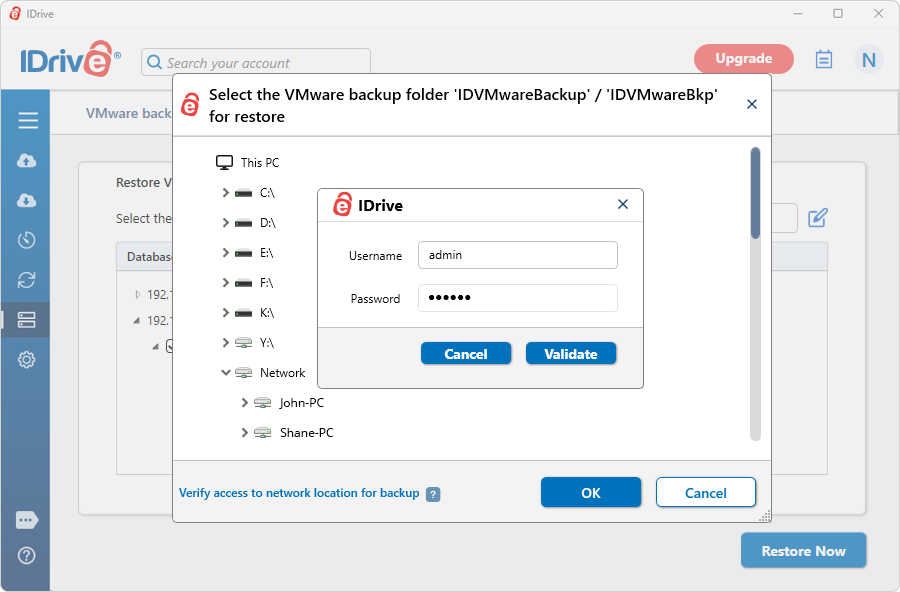
How do I perform backup of VMware virtual machines to a network location or network-attached storage?
To backup your VMware virtual machines to the network,
Go to 'Server Backup'. A slider menu will appear.
Click 'VMware'. The VMware login screen appears.
Enter the IP address, Port, Username, and Password of the server and click 'Connect'.
Select 'Local Backup'.
Select the required virtual machine(s) from the list which appears.
Click 'Verify access to network location for backup'. This will open the 'Network Details' pop-up.
Enter your NAS/Network UNC path (''\\IP Address or Computer name\dir''), username, and password to validate.
Click 'Schedule'.
The 'Scheduler' appears where you can schedule the backup for any future day and time or perform an immediate backup of the selected virtual machine(s).
Do I need to turn off or shutdown the virtual machine(s) in VMware manager to take a backup?
No, you do not have to shut down your active virtual machine(s) to perform a backup. IDrive enables you to backup virtual machine(s) in their running state.
Does VMware restore support different disk format conversions?
Yes. During the restore process, VMware virtual disks can be converted to different disk formats. Supported formats include Microsoft Hyper-V virtual disks (VHD fixed and VHDX) and RAW image formats. This enables restoring VMware backups to different platforms such as Hyper-V or physical machines.
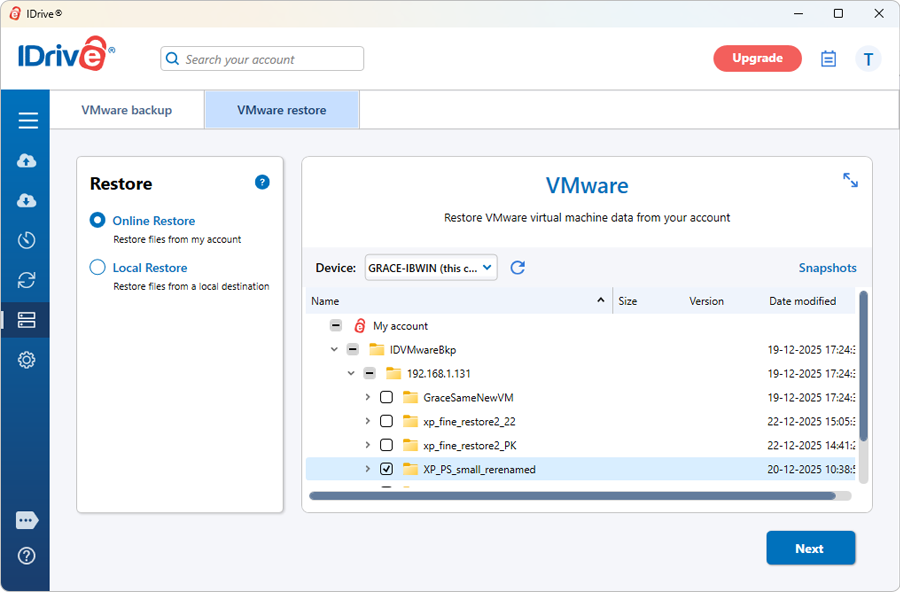
How do I restore virtual machines to a VMware server using Online Restore?
IDrive supports restoring VMware virtual machines using Online Restore.
To restore a virtual machine using Online Restore,
Sign in to the IDrive application.
Go to 'Server Backup' > 'VMware' > 'VMware restore'> 'Online Restore'.
Select the VM from 'IDVMwareBkp' backup set folder and click 'Next'.
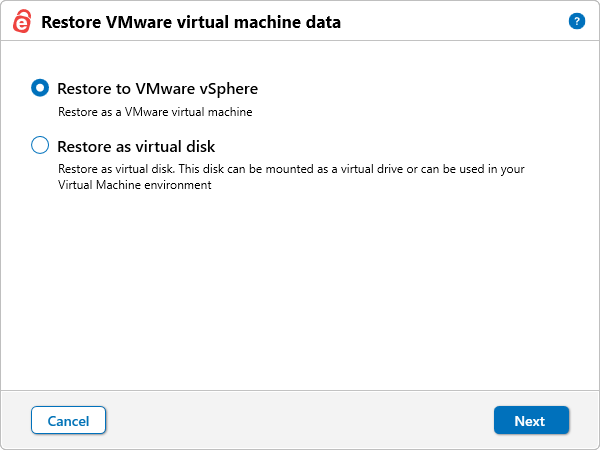
In the 'Restore VMware virtual machine data' popup, choose one of the following restore options:
- Restore to VMware vSphere, or
- Restore as virtual disk
If 'Restore as virtual disk' is selected:
Choose the required virtual disk format (Raw image, VHD, or VHDX).
Select the destination folder where the virtual disk should be restored.
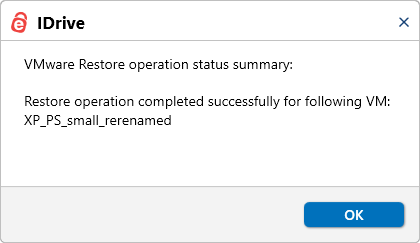
Click 'Finish' to start the restore. On successful completion, the restore summary is displayed.
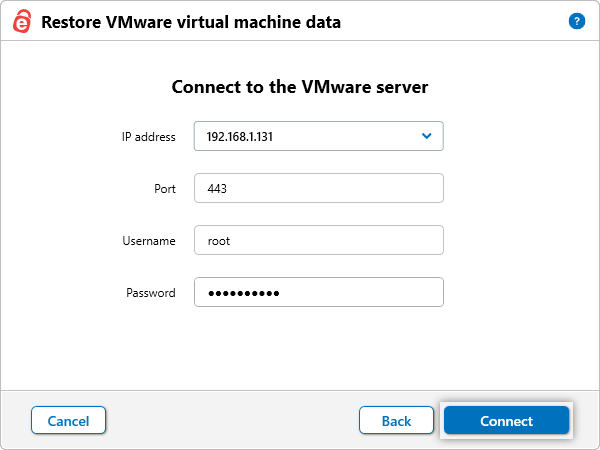
If 'Restore to VMware vSphere' is selected:
Click 'Next'
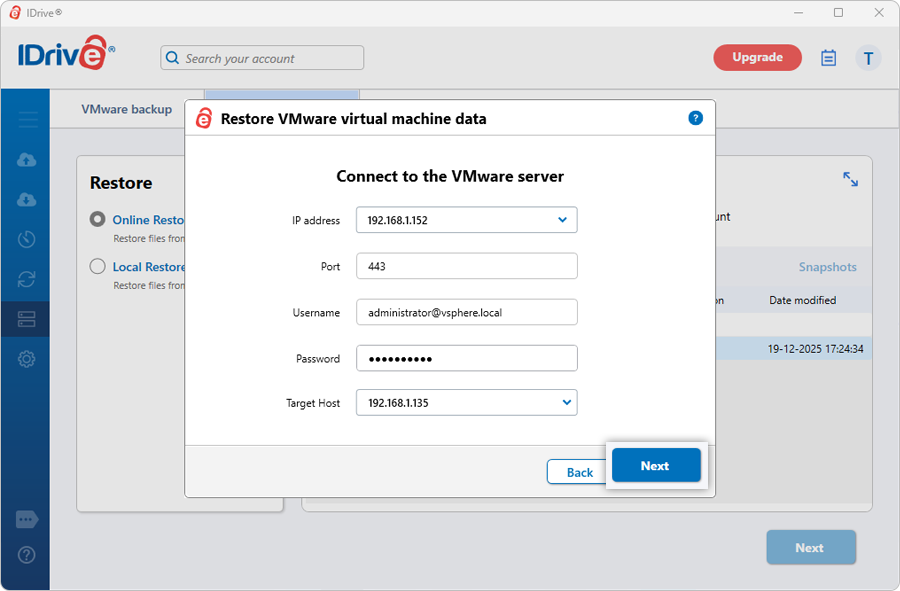
Enter valid VMware server credentials and click 'Connect'.
If the credentials are for vCenter, clicking 'Connect' displays the 'Target Host' dropdown. Select the required ESXi host and click 'Next'.
If the credentials are for ESXi, clicking 'Connect' will open the Restore VMware virtual machine data' popup.
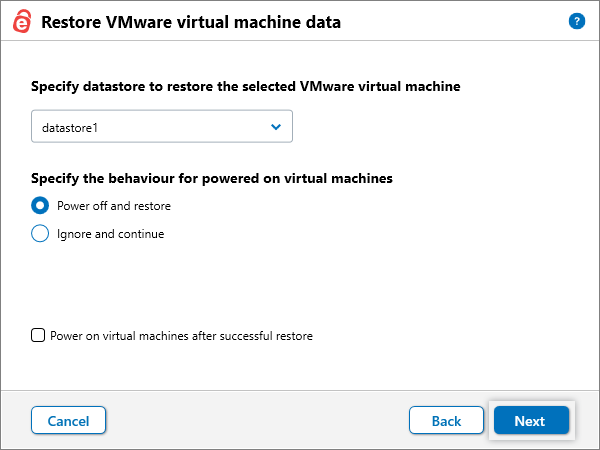
Select the datastore where the virtual machine should be restored.
Choose a power state option:
- Power off the VM before restore
- Ignore and continue (restore fails if the VM is powered on) - Power on the VM after successful restore
Click 'Next'.
The 'Restore VMware virtual machine data' popup appears.
By default, 'Existing machine' is selected.
To overwrite an existing VM, select 'Overwrite the existing virtual machines'.
To restore as a new VM, modify the VM name under 'Restore as' and enter a valid name.
Click 'Finish' to start the restore. On successful completion, the restore summary is displayed.
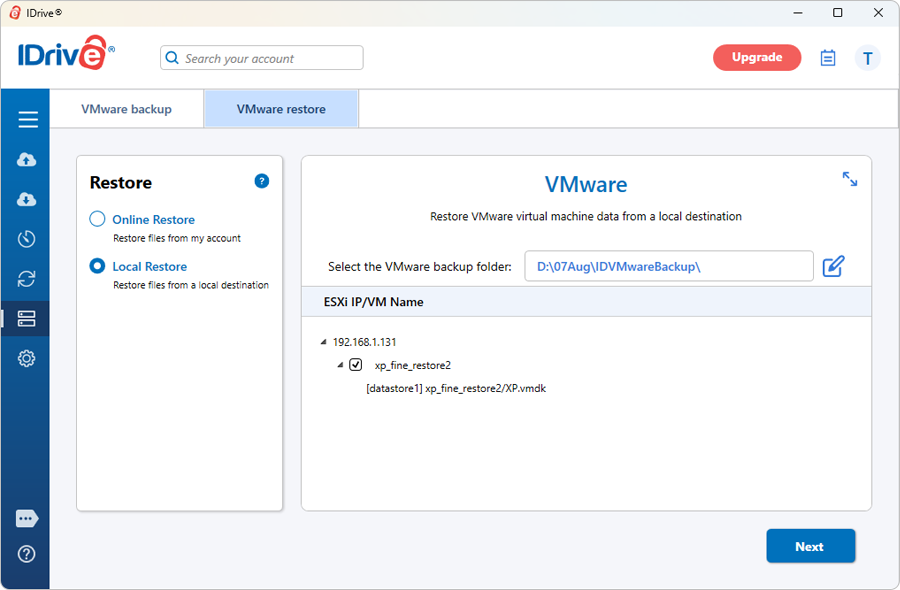
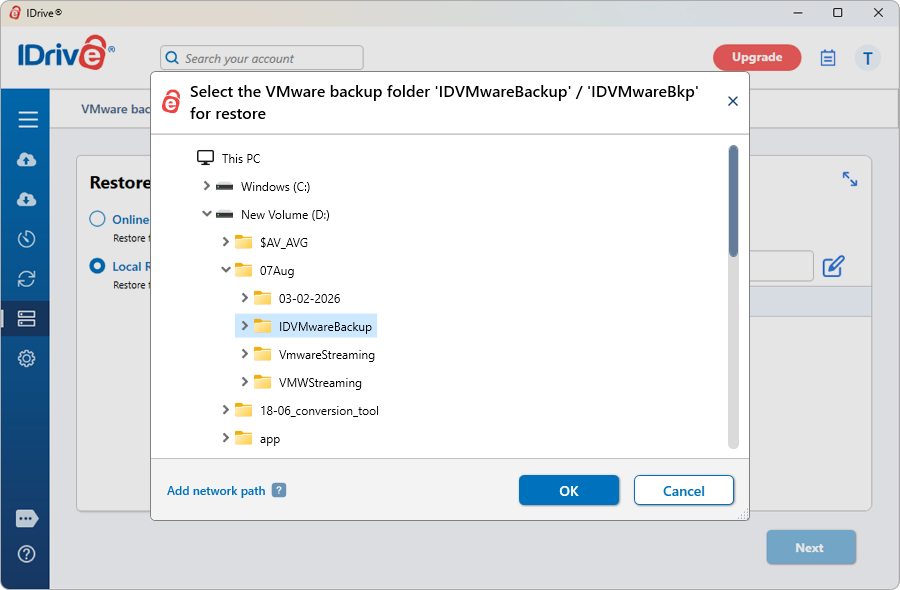
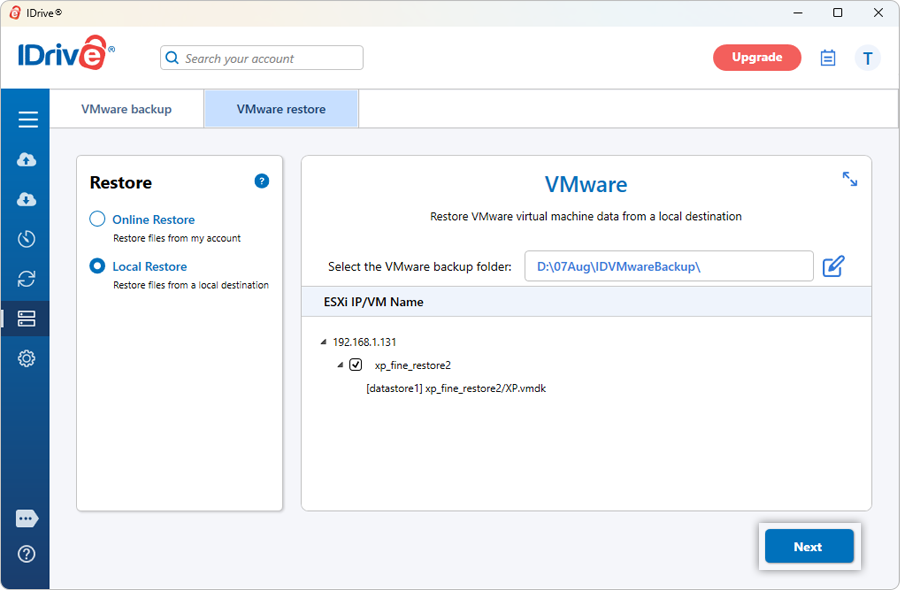
How do I restore virtual machines to the VMware server using Local Restore?
IDrive supports restoring VMware virtual machines using Local Restore to ESXi or vCenter servers.
To restore a virtual machine using Local Restore,
Sign in to the IDrive application.
Go to 'Server Backup' > 'VMware' > 'VMware restore'> 'Local Restore'.
Locate and select the 'IDVMwareBackup' or 'IDVMwareBkp' backup set folder from your local drive.
Select the required VM from the backup set and click 'Next'.
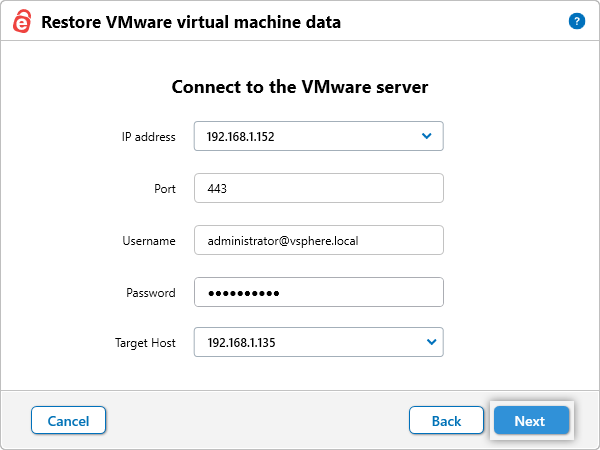
Enter valid VMware server credentials and click 'Connect'.
If the credentials are for vCenter, clicking 'Connect' displays the 'Target Host' dropdown. Select the required ESXi host and click 'Next'.
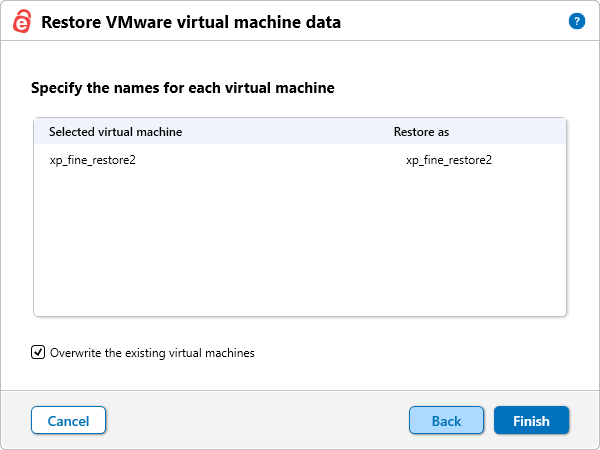
If the credentials are for ESXi, clicking 'Connect' takes you directly to the 'Restore VMware virtual machine data' popup. By default, 'Existing machine' is selected.
To overwrite an existing VM, select 'Overwrite the existing virtual machines'.
To restore as a new VM, modify the VM name under 'Restore as' and enter a valid name.
Click 'Finish' to start the restore.
On successful completion, the restore summary is displayed.
Can I restore VMware virtual machines from a network mapped drive or NAS drive?
Yes. IDrive allows you to restore VMware virtual machines from a network mapped drive or NAS drive using Local Restore.
To restore virtual machines from a network mapped drive or NAS drive,
Ensure the network mapped or NAS drive is accessible from the system running the IDrive application.
Verify that the 'IDVMwareBackup' or 'IDVMwareBkp' folder is available on the mapped or NAS drive.
Sign in to the IDrive application.
Go to 'Server Backup' > 'VMware' > 'VMware restore' > 'Local Restore'.
Browse and select the 'IDVMwareBackup' or 'IDVMwareBkp' folder from the network mapped or NAS drive.
Select the required virtual machine(s) from the backup set and click 'Next'.
Enter valid VMware server credentials and click 'Connect'.
- If the credentials are for vCenter, clicking 'Connect' displays the 'Target Host' dropdown. Select the required ESXi host and click 'Next'.
Is there a need for an additional/external storage volume for VMware backup?
VMware Online Backup does not require an additional or external storage volume. However, a minimum of 2.5 GB of free space on the C: drive is required for temporary files during the backup process.
VMware Local Backup does require an additional or external storage volume. Ensure that the selected temporary backup location has sufficient free disk space to store the data being backed up.
Does IDrive VMware Online Backup support SAN and HotAdd transport modes?
Yes, IDrive VMware Online Backup supports both SAN and HotAdd transport modes, allowing efficient data transfer based on your deployment environment and infrastructure configuration.
These transport options help optimize backup performance by leveraging the most suitable data path available within your VMware setup.

 against 'Temporary path for VMware local backup'.